


If you are looking to create O365 Groups without SharePoint Online, this post is for you. Office 365 provides you access to an enhanced collaboration technique. Creating a group on Office 365 should be quite easy and straightforward to work with.
However, if you are looking to find information on alternate methods to create a group on Office 365, the suggestions here should be helpful for you. Let us also check out different ways to create a group on Office 365.
What are Office 365 Groups?
A group is a well, a group. An Office 365 group would be what we can define as a group of people who share a collection of documents and files between them. The resources can include data, chats, messages, sites, PowerBI reports, images, and everything in between.
The groups will provide you with role-based shared access to the resources. This will help make the collaboration between members an easy task. Everyone in your organization should be able to create a group. Unlike the earlier days where you needed an admin to create a group, so if you are looking to create a group to share your files and collaborate, you can create it right away.
How to Create an Office 365 Group without SharePoint
Creating an Office 365 group would not be a difficult task. Several options would help you create an Office 365 group. Let us explore the possibilities one by one and attempt creating a group with them.
Method 1 – Use Microsoft Admin Centre
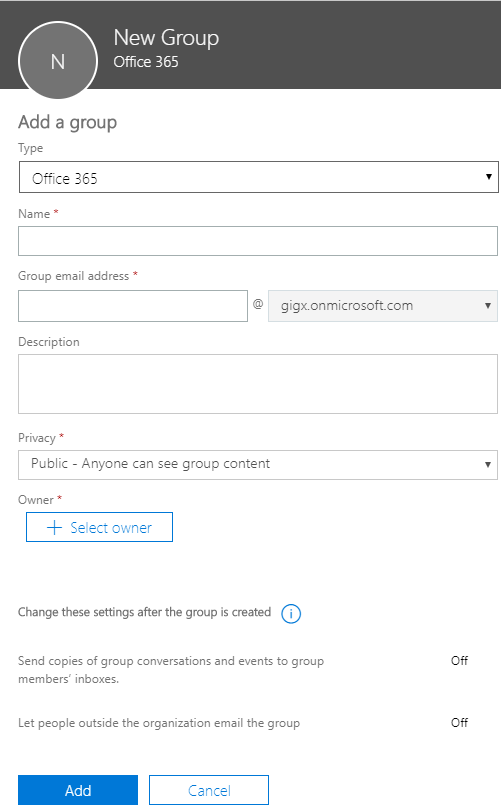

This is one of the most common options to create a group in Office 365. The steps involved in creating an Office 365 groups should be quite easy to follow.
Check out the steps as in the following details –
- Go to your Office 365 Admin Centre
- Choose the option Groups and then click on You should find the option on the left navigation pane
- Locate and click on Add a Group.
- Make the following entries on your new group
Under the type of group, enter Office 365
- Type a name for the group.
- Type an email ID for the group.
- Click on the Select Owner option and designate a person who will in charge of managing the group.
- Click on add
- Next click on close
That way you have created your group on Office 365. Once the group is created, the next option would be configuring your group.
Here is how you would be able to configure your group –
- Launch your Microsoft Office 365 admin center from the above link.
- Refresh the center until you find the new group you just created.
- Click on the group.
- Locate the option for Members
- Click on Edit
- Next, click on Add Members.
- Select the users you would want to add, and once you have added all the members you want to, click on save
- Close the group by clicking on Close
The group should now appear in Outlook with the members assigned to the group.
Method 2 – Use Microsoft Planner
Microsoft Planner can be an excellent option to create a group Office 365. There are two types of plans available on Microsoft Planner. The public plans are visible for everyone, and the private plans would only be available for the people that you invite.
Ideally speaking, whenever you create a plan on the MS Planner, a group is created to support the plan. Here is how you would be able to create a group using Microsoft Planner –
- Launch Microsoft Planner
- Start a new plan by choosing the New Plan.
- Give an appropriate name to your plan.
- Choose whether you want to create a group or not.
- Choose who can view your plan.
- Choose to Create a Plan to create a new plan and the group.
That does it. You have successfully created a group effectively.
Method 3 – Create an Office 365 Group in Outlook
The Outlook is yet another excellent option to create a Group in Office 365. There are several options you can check out to create a group in Outlook. You can check out different options like Windows, Outlook Web, Mobile, and PC group.
Here are the steps you would need to follow –
- Launch Outlook on your Windows.
- Choose Home and then click on New Group
- Fill out the information about your new group
This will include group name, description, classification of the group, and privacy settings for the group.
- Choose the option to create
Method 4 – Create Office 365 Group in Yammer
Yammer is an excellent option to work with your Office 365 subscription. It can be an excellent option for collaborating with your teams. It can work with all your conversations, projects, and events. It can work as a central place for almost all your communications, files, and updates.
When you create a group in Yammer, you will be the owner of the group. Here is how you can create an Office 365 group in Yammer.
- Launch Office 365
- Click on the Yammer Title on your Office 365
- Choose the option Create a New Group. You should find it at the bottom left corner of your screen.
- Select the option among Internal Group or External group as per your preferences.
- Under the option Group members, add the name and email addresses of your group.
- Under the option, Who can view conversations and post messages, choose either public access or private access.
- You can also make changes for the classification of the group since it is a group belonging to Office 365.
Finally, click on Create and your Office 365 group is created.
Method 5 – Use Microsoft Teams
As soon as you create a Microsoft team, you will find the group formed. The backend of Microsoft Teams creates a Group in the backend. The group created using Microsoft Teams will not be accessible on the Outlook client app.
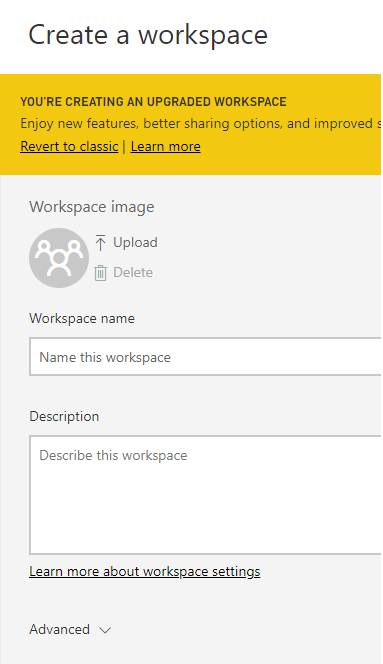
Method 6 – Use Microsoft PowerBI
Microsoft’s cloud-based reporting tool PowerBI offers the concept of “Workspaces.” When you create a new workspace in PowerBI, you actually create an O365 group. See below:

What is a Microsoft Office 365 Group?
Creating an Office 365 Group will help you get all the Office products without hiccups. Once you create a group, you will get all the aspects of the group right away, and that includes Team sites, OneNote, shared Outlook inbox, shared Team chat, Yammer, Planner, and Calendar – to name a few.
Office 365 can be a great option to help you centralize and provide you centralized access to all your Microsoft products at one place. If you have been using security groups, you will find no difference between the security groups and Office 365 groups.
Do understand that the Office 365 group is not a new product. It is not designed to compete with any of the existing Microsoft products. It is equivalent to your security groups. It ensures centralized management of all your Microsoft products.
Why Use Office 365 Groups?
Using the Office 365 Groups will help you provide a choice for your teams, projects, and business units. An Office 365 Group will give you access to conversations, calendars, a file management service, a fully-featured site collection, and a host of other details.
The conversations can include several options, Outlook conversations, Microsoft Teams conversations, and Yammer conversations, to name just a few. They can provide you with access to a few useful options. They can be used to email in Outlook, share the documents through OneDrive, indulge in collaborative conversations in OneNote, and opt for a host of other activities with ease and simplicity.
The Concluding Thoughts
Those were a few inputs into the Office 365 groups and how to create them without the need for SharePoint. Office 365 provides you access to several options to create an Office 365 group that can come in quite handy in arriving at the best possible functionality. As can be seen in the above discussion, you would find that Office 365 Groups should assist you to arrive at the best possible results.
If you have used Office 365 groups, check out the functionality and features offered by them, and share your experiences with us.